Details of Setting Limits
When you watch the video below, you will see how to set the top and bottom limits on roller shades. It is very simple when you understand the concept, but let me say it this way. It is all about timing! Let’s go over the details. I will try to make it as simple as possible, but seeing it in action first will help as we break it down afterward.
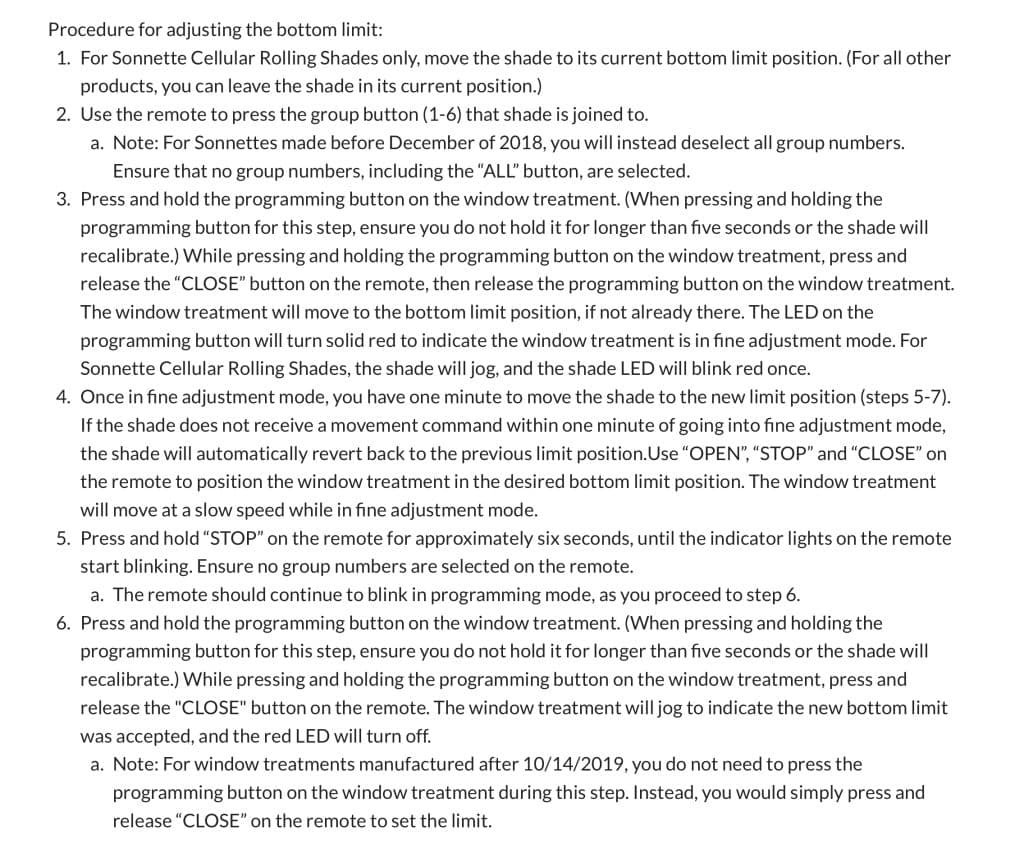
Technical Programming Details
Now The Easy Way to Read The Above
I think you can see why reading the manual is so incredibly difficult. I know how to do it and I struggle. So, here is my simple breakdown.
- Turn off all the channels on the remote control. Numbers 1-6 and the ALL button need to be off.
- Place your finger on the button of the remote that you are adjusting, but don’t press it. In this case, the down arrow (Close).
- Get ready to press the manual button on the shade you are adjusting.
- Press and hold the manual button on the shade and immediately press and hold the button you are adjusting on the remote
- Immediately release both buttons. (The light on the manual button will have turned red.)
The Shades are now in Programming Mode
- Place the remote control into the channel that you are adjusting
- Press either UP or DOWN with the remote to locate where you want the setting to be.
- Press STOP to set that spot you decide on using. ( In this case, The CLOSE button)
- Now put the remote into programming mode. Press and hold the STOP button until the remote control starts to blink or flash the lights. Now the remote control is in programming mode.
- Now, follow the steps #1-4 and it will turn green instead of red.
Programming of bottom limit is done.
Setting Limits For All Positions
In this case, I showed how to we were setting limits for the lower position. But only one thing changes when adjusting other limits. When setting the upper position, you hit the UP button both times instead of the DOWN button. You can also set limits for hybrid shades that use the side up and down arrow buttons. The concept is the same, but it requires a bit more information. So, please use this information when setting limits for your Top and Bottom positions. I hope it was helpful to read this, but the video is always better for those of you who are visually focused.
About Us
Kempler Design is located in Reno NV and serves the northern Nevada and Lake Tahoe regions with a mobile design showroom. Paul Kempler, its founder is considered a window fashions expert. Kempler Design has been featured in many prestigious projects, including the HGTV dream home in Lake Tahoe. Kempler Design works with homeowners as well as interior design firms looking for a local contact in the Reno/Tahoe area or is available for travel.